09 August 2011

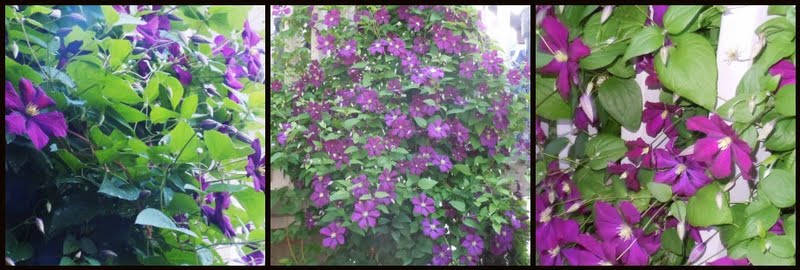
In the Spotlight: Jackmanii Clematis


This Jackmanii Clematis is roughly 9 years old and clambers up the side of my deck, facing west.

Description:
The Jackmanii Clematis is a modern hybrid clematis with large showy blooms which can be as large as 5-6 inches across and are a magenta to deep purple.  The Jackmanii clematis was produced by nurseryman George Jackman (1837-1887) of Jackman & Sons, Woking, Surry, and was available on the market in 1862.  

Growing to heights of near 20 feet tall and four feet wide, the Jackmanii Clematis is a superb vine offering masses of purple blooms on healthy twining vines.  A suppport, such as a trellis, is essential for the clematis to climb.  The Jackmanii Clematis requires 6 hours of direct sun a day to achieve optimal blooms.  

Planting:
When selecting your plant, choose one with several vines coming from the root, preferably with the lower portion somewhat woody to ease the transplant process.  Carefully remove from pot and dig a hole about 18 inches deep.  Amend with compost and sprinkle a scant handful of bonemeal in the bottom of the hole and cover this with a bit of soil before adding the vine.  Plant the clematis a foot deeper than it was in the pot so the roots are well shaded and cool.  Fill with good, well-draining soil, amended with compost, gently but firmly tamp down to remove any air pockets, and water.  Gently aid the vines to the trellis so they fan out in a "V" formation.  In two weeks, you may fertilize with a water soluble fertilizer. (See fertilizer below).

It is highly recommended to plant a low growing perennial in front to further shade the roots and keep them cool.  I use irises for this purpose.  In lieu of planting, one may use a large flat rock placed in front to further shade the roots.  A mulch of a couple inches is highly recommended as well.


Fertilizing:
Compost and bonemeal should be added yearly, digging in to just the top couple inches so as not to disturb the roots.  You may also fertilize monthly from early spring until the clematis begins to flower, with a fertilizer designed specifically for clematis and vines or with a general purpose 20-20-20.  Do not fertilize once the vine begins flowering or all the blooms will come at once and the vine will not flower continually until frost.  


Pruning:
Jackmaniii clematis belong to the "C" group, meaning they bloom during summer and autumn and should be hard pruned above second or third set of the buds, 20 - 50 cm (approximately 1 foot) from the ground in late winter or early spring.  I generally wait until I see new growth, then prune back to the second set of buds.
***

Jackmanii is one of the most hardy clematis and a very popular choice with few if any insect problems and rarely any instances of disease.  Clematis wilt is a problem known to affect any variety of clematis and can generally be avoided by planting the clematis deep to keep the roots cool, as indicated above.  Garden sulfur is the recommended treatment.  I found a good article here for further information.

08 August 2011

A Garden Stroll at Dawn


I love gardens and am joining Mary at The Little Red House for Mosaic Monday,   
and Glenda at Tootsie Time for Fertilizer Friday/Flaunt Your Flowers
and Hey Harriet for  Shadow Shot Sunday.


03 August 2011

The Lure of Evening Scented Stock

I am sitting here on the computer and I know it's time to get off and relax with a book.  But there's a sweet scent on the air, wafting through the open window.  Beckoning me near.....


The evening scented stock (mathiola) is blooming!

Gregoire Lake


My husband just sent me this photo, taken with his phone, of Gregoire Lake, Alberta.  I wonder if there's any sand here?


Wordless Wednesday - Can You Imagine a Sky So Yellow?


This is my contribution to Wordless Wednesday

Can you imagine a sky so yellow?


02 August 2011

Top 10 Gardening Mistakes to Avoid

Photo taken at Greenland Botanic Garden.  A good example of excellent planning, mixing perennials with trees and shrubs for a natural and finished effect.
New and experienced gardeners alike often become over zealous when acquiring plants for their garden. I know I have done it many times.  They just look so good in the store and I know they'll be a great addition to the garden.  But where to put them?  That can be a problem, unless, like me, you  don't mind digging up more and more of the green stuff (lawn, I mean but the other is required for the ambitious gardener too) to make way for the new.  As a gardener, I have high aspirations for my yard.  I know the look I am going for and with a little juggling, it will be accomplished.  But a word to the wise, with a heads up, there are some gardening mistakes you can avoid.
.
Blunder #1: Failure to plan.

Before you rush into the garden centre, make up a plan for your yard.  It doesn't have to be professional and can be done on graph paper.  A plan helps you with the budget as well as helping you avoid the mish mash look that can occur when everything you love is thrown together.  It's best and easiest, when taking on a new project, to break it into smaller accomplishable tasks.  For instance, when we set out to landscape our back yard that was devoid of everything but grass, we started with one bed, which initially was a vegetable garden.  Around the same time, I began working for a local greenhouse/nursery and the aspirations grew from there.  One bed begat another and soon the entire perimeter became beds for trees, shrubs, and perennials.  A pond was added, thus the vegetable garden was bid a fond farewell.  Some aspects of these beds I truly love, probably because some planning went into their design.  But theres' the bed on the west side that needs a do-over in the worst way.  (yes, it was an afterthought.  The catch-all bed for the extras)
This is the bed, in the right portion of the photo, which will be re-designed.
Blunder #2: Buying poor quality tools.

It's true with garden tools, as with anything else.  You get what you pay for.  Having to continually replace tools due to breakage or bending or inability to do a task, is more expensive in the long run and can certainly dampen your gardening spirit.  Buy the best quality tools you can afford.

Blunder #3: Not knowing your soil.

Before you plant, get to know your soil.  Is it clay, sandy, a good loam or rocky?  Unless you have a rich loamy soil, which plants love, you will need to amend it before planting.  Here in Edmonton, we have clay soil.  Fort Saskatchewan, just north east of us, has sandy soil.  Prepare your soil, dig and amend, before you plant.  A good loam is rich in organic matter and doesn't drain too quickly nor does it stay wet for prolonged periods.  Adding compost to your garden soil will enrich the nutrient value, make it more friable, improve drainage and, because it is the ideal medium, helps plants better fight off disease and pests.

Soil tips:
 - Try to avoid walking on the soil, once you have planted.  Compaction of the soil can occur with increased traffic, making it difficult for plants to retrieve the water and nutrients they need and inhibits root growth.  Create paths instead.
-  Don't work a wet soil.  Doing so will result in a clumpy hard-packed soil when it is dry.
-  Don't overwork the soil. The best soil has varied sizes of particles and is not fine and dusty.  The variable sizes aid in drainage.
Shade gardening with ligularia.  Photo taken at Greenland Botanic Garden.
Blunder #4: Planting in the wrong spot.

Take note of the sun and shade in your yard.  Some plants require full sun, 6 hours of direct sunlight, while others prefer part-shade or shade, to grow their best.  Plant according to the sun and shade patterns in your yard.  Keeping in mind that planting on the south side of a house is hotter than the east, so certain plants will perform better there than others.  Do your homework.

Blunder #5: Overcrowding shrubs and trees.

Guilty as charged!  Keep in mind the size in height and width of the tree and shrub before you select its location and plan for these dimensions when planting them together.  Overcrowding is not healthy for the plant (lack of air flow), nor is it appealing to the eye.

A good example of planting in groups.  Taken at Greenland Botanic Garden.
Blunder #6: Scattered plantings - not planting in groups.

Arrange similar plants together.  To have one delphinium here and another in different bed is not appealing.  Try grouping in threes and fives to the best impact.  It is advised to plant in odd numbers for the best visual result.

Blunder #7: Purchasing poor quality plants.

Don't buy just because it's on sale or it's cheaper than other stores.  Cheaper with plants is not always better, particularly if you are new to gardening and are unsure of what attributes to look for when making your selection.  It's best to buy from a reputable garden centre, where the plants are well cared for and the staff are knowledgable.

Note:  You might consider using native plants as they are easier to grow, have fewer disease and pest problems and often require less of the gardener in terms of care and watering.

Blunder #8: Planting Too Deep

Plant container grown plants at the same depth as the surface of the soil in the pot it is growing in.  Planting too deep can lead to root rot and other problems.  The exception to this is clematis which grow best if planted a foot deeper than they are in the pot.

Blunder #9: Over or under watering

Here's a big mistake that many gardeners make.  Depending on the weather and the type of plant, your water needs will vary.  A weekly rainfall of one inch (2.5 cm) is ideal for most plants.  You may use a rain gauge, if in doubt, or try putting a plastic container out to collect the rain.  Measure the depth of the water after the rainfall to determine if you need to adjust your watering.   Other tips:

- Avoid frequent shallow waterings. This encourages the roots to grow shallow, near the surface, instead of reaching deep into the soil for water.  A plant with deep roots better survives a period of drought than one with shallow roots.

- The best time to water your garden is early morning or early evening.

photo taken at Greenland Botanic Garden.  Imagine if this were weedy.
Blunder #10: Being a negligent weeder

It is important to maintain a virtually weed free garden as it eliminates competition for moisture and nutrients, allowing roots of desirable plants to grow at their optimum.  To help keep this task manageable, try spreading a mulch of wood chips or shredded bark around your garden.  This will inhibit weed growth and help to retain soil moisture while maintaining a stable soil temperature.

See also:
Xeriscaping
Planting for Shade
Design Faux Pas and Favourite Tips

31 July 2011

Who Says Hostas Are Only for Shade?

Hostas seem to be synonymous with shade.  At least that's what we've been told.  A few years back I was on a garden tour and saw a profound garden.  Profound in that she, the owner/gardener, was growing hostas in full sun!  When asked how she was able to grow such healthy looking specimens in the full sun, she said "water".  Don't let the soil dry out and they'll be fine.  That was the first but not the last time I was to see this.

This year, while touring a botanical garden, I saw several varieties of hosta planted in full sun.  They were not scorched nor wilting.  So much for the theory of hostas being solely shade plants.


If you decide to try growing hostas in the sun, there are some varieties that will do better than others.  Gold leaved plants and heavily variegated specimens, more white or cream than green, can tolerate sun if the soil is moist.  REMEMBER:  ADEQUATE MOISTURE.  Some hostas, though, may still scorch, even in moist soil.

Blue leaved or solid green varieties tend to scorch, even in moist soil.


I have two hostas that are very similar in foliage, the photo above is one of them. They are planted on the east side of a fence where they receive at least six hours of direct sun every day.  This is a moist bed, the last to dry in the entire yard, which could explain why both seem so happy here.  I only wish I could remember the names of them.  They were purchased a few years ago when they were new introductions but the tags have disappeared long ago. ("fire" is part of the name)  If anyone recognizes this variety, please let me know in the comments section.

Some varieties you may consider are:
Sum and Substance
Sun Power
Gold Standard
Guacamole
Fragrant Bouquet
August Moon

Check your local garden centre for further suggestions of sun tolerant hostas.  There are some varieties like August Moon that some direct sun exposure will emphasize more yellow tones.  

If in doubt, plant in a part-shade garden, with morning sun and afternoon shade, remembering the sun is at its strongest between 11 am and 4 pm. Note:   The southern states' sun may be far too strong for any hosta in full sun. 

* I am participating in Mosaic Monday today.  Stop by for more mosaics.  Mary's blog, Little Red House, has some magnificent photography.  Take your time and browse around.  You can tell her "The Gardening Life" referred you.

30 July 2011

Deep in Shadow

Shadows in photos can be intricate or vague 
but shadows on their own appeal to the creative senses.  
This was taken this morning in my garden.

Shadow Shot Sunday features photos from around the world, sharing unique shadowy perspectives.

29 July 2011

The Storm That Disappeared as Quickly as it Came


Earlier, just before lunch, it was rather warm and sunny.  The clouds moved in around 1pm and then about 1/2 an hour ago, this deluge.  It was gone as quickly as it appeared.  Now, sunny again.  :)

For more Sky Watch Photos from fellow sky gazers, see Sky Watch Friday.

28 July 2011

Summer Blooming


 It's time to flaunt the beauty of summer.  Included in bloom now are delphinium, above, tomatoes, radish!!, heuchera, hostas, columbine (not shown today), and a couple blooms still remain on the mock orange.  Come along for a garden stroll......


 Aphids are bad on the tomatoes right now!


 The very last of the mock orange blooms, above.


 I love that moss will grow in the crevices around the pond.  It volunteered here.


 Our favourite spot in the yard, above and below.


The amur maple samaras are turning pink already.


 Summer Wine Ninebark, above.


Bridal Veil Astilbe, above.


 Heucheras in bloom (coral bells), above and below.


 Fuschia, above.


This hare rests conspicuously in a neighbour's front yard just across the street from us.


 Fruits of the alpine currant, above.


Hostas are in full bloom now.

Even this silly radish is blooming.  All my radishes went to tops this year.  I seem to have terrible luck with them.  I planted near the end of May.  Any suggestions, anyone, on how to get radishes to actually grow?

What's blooming in your garden?  Please leave a comment here with a link to your blog or your Fertilizer Friday/Flaunt Your Flowers post.  I'd love to see what's blooming in your neighbourhood.  I'm joining Fertilizer Friday/Flaunt Your Flowers with Glenda at Tootsie Time.  
Come on over to see what's in season.

LinkWithin

Related Posts Plugin for WordPress, Blogger...